I never thought I’d write this post. I’ve been with Canon for years; my first ‘real’ film camera was a Canon, my first DSLR and every camera since until this week was a Canon. I owned several L lenses; I never thought I’d be here writing about switching platforms and ‘going Sony’, but here we are and that’s exactly what I’m writing.
Three days ago, Canon marked down its 3rd quarter outlook due to weak digital camera sales. How big was the hit? Just a minor $10 Billion dollars! Now, I’ve been thinking about writing my “breaking-up with you Canon post” for a few days, and now with the Canon earnings outlook, I thought: “yah, I better get on this”. I figured I should tell Canon why just a few thousand dollars of the big $10 Billion were not coming from me. So, how did we get here?
I remember when the first few micro 4/3 cameras made it to market in 2005/2006. “Mirrorless, bleh,” I remember thinking. Sure these new-fangled mirrorless cameras were small and light, but micro 4/3? I couldn’t understand why anyone would want a sensor even smaller than APS-C. Who would want a smaller, noisier, sensor just to save a bit of carry weight? Besides, how good could the lenses be- Canon has a history of excellent lenses? I rightly outright dismissed the early Olympus and Panasonic cameras. No serious photographer would really go mirrorless.
In June 2010, though, Sony released the Nex-7 and things got interesting. APS-C sensor, 10 frames per second, OLED viewfinder, in-camera HDR, whoa. Sure the lens collection wasn’t big, but Zeiss lenses…now we’re talking! Tempting, but still just APS-C (I wanted big, clean, pixels!). I’m wasn’t about to dump my 5D Mark II. The Nex-7 was compelling, but it wasn’t compelling enough. Besides, I had a big Canon lens investment. I wasn’t going to switch but, for the first time, I thought: “not bad mirrorless camp, not bad.”
As one Sony Nex camera after the other was released, I thought: “Canon is going to respond- there’s market here. I wonder what Canon will do?” And, what did Canon do? Canon waited a full two years after the Nex-7 before announcing the EOS M- a camera as compelling as dental surgery. It was as if Canon said: “Let’s think of the worst camera we can make, and let’s make it mirrorless. Maybe then those kids out there will see the error of their ways and buy DSLRs.” Predictably, no one bought the EOS M. The AF was slow, the ergonomics were less than impressive, and no one was interested- at least I wasn’t
Things got more interesting just a few months after the announcement of the EOS M. In September 2012, Sony announced the first full-frame mirrorless: the RX-1. Ok, it had a fixed 35mm f/2 lens, but still: it had a full-frame sensor (and that was a Zeiss lens boys and girls.) What did Canon do? Canon waited a full year before releasing the less than compelling EOS M2 (a me-too 18megapixel APS-C with slightly improved AF and built-in wifi). Mind you Canon announced the M2 just 3 days before Sony announced the A7 and A7R (24 megapixel and 36 megapixel full-frame pro class cameras that turned the world upside down).
Some would call the A7R the iPhone moment for the Canon blackberry. I wouldn’t go so far. Canon still has a fantastic product line, but Canon was dug in and, it seemed, worried about cannibalizing its own product line.
Canon, it seemed, just wasn’t seriously interested in the mirrorless market. But, guess what, photographers were. Specifically, I was. I wanted a small, light, full-frame body- not to mention the host of features Sony was touting (focus peaking, manual assist, OLED EVF, the list goes on). Canon, wants me to buy a DSLR. I looked at the 5D Mark III many times, but I can get a larger sensor, excellent image quality (not to mention fantastic dynamic range) and a host of features from the Sony A7II. And so, I write this as the last few bits of my Canon gear sit on eBay. Last week marked the farewell to my 5DMKII and all my L lenses. It also saw the purchase of a Sony A7II and Zeiss lenses (Zeiss 16-35 f/4 FE and Zeiss 24-70 f/4 FE.)
Canon: I wanted it to workout, but it didn’t. Maybe one day our paths will cross again, but right now, I don’t see it happening. Switching platforms was not easy and if Sony keeps on innovating like Sony has been (hello A7RII, you beautiful beast), I won’t switch back. Canon now has 10 billion reasons ($) to build a pro-grade mirrorless camera and I hope Canon does as competition can only make things better. Who knows, maybe I’ll pickup a Canon again someday, but not now. Now, I’m building my Zeiss lens collection.
Not too long ago capturing motion control timelapses meant spending thousands of dollars. Sure, you could “DIY it”- it didn’t cost you much to put your camera on an egg timer and wait for the “spin cycle” to complete, but good luck programming that setup!
Looking around these days, though, you can easily find a motion control head under $250. The options and features abound, and many, like the Alpine Labs Radian Motion Control Timelapse head ($249 over at B&H) we’re going to look at today, started their life on Kickstater- this means there’s a community there out of the gate tinkering and making suggestions to improve the product. But how good can a sub $250 motion control head be?
What is it it?
Radian is a lightweight single-axis motion control head. Single-axis means you can capture tilts or pans, but you don’t get linear motion on a slider.
Radian is, light, light, light. It weighs just 15 ounces (425g for ye metric folk) and measures 4.57 x 1.77” (116 x 45mm). It fits very easily in my camera bag and I don’t mind carrying it along a hike. To put this in perspective my Canon 24-105 f/4L weighs 1.47lbs (670g). Think of Radian as a light 2nd lens you’re bringing along. This is a big deal! When you’ve walked 13 miles with food and water strapped to your back, you’re thankful for every ounce you’re not carrying!
It’s light, but it’s also all plastic. I wouldn’t call it flimsy, but I also wouldn’t call it a bullet-proof all metal design- keep this in mind if your’e hopelessly rough on your gear.
Using it
Setting it up is straight forward: Radian attaches to a 1/4″ screw (no 3/8″) so just turn Radian onto the bottom of your camera then attach it to your tripod head. Radian includes a little bubble level in the package. This is nice, but I really wish the bubble head was integrated into the unit – one gust of wind and that bubble level is gone!
Software
Radian doesn’t have an LCD screen -you program it using your iOS or android device. What this means is the programming user interface is easy to use and, more importantly, Radian’s functionality is constantly being tweaked through Alpine Labs app updates. What’s also nice is you only program Radian using your phone: your phone doesn’t have to remain connected to execute the timelapse like other apps such as TriggerTrap. You just plug-in your phone, program, and disconnect. Once your phone is disconnected the Radian app keeps track of your timelapse’s progress. This lets you walk away and just pull out your phone to see if you need to go back to your tripod(s).
Take a look at images below to get a feel for the user interface.
Should you get it ?
For $249 it’s a good timelapse device to have. It’s small, lightweight, and easy to bring along. If you’re shooting atop of mountains, or anywhere where wind is pervasive, I’d say look at something else. Outside of that, it’s well worth the investment for a single-axis timelapse head.
Where to buy
B&H – $249
Most discussions of hyperlapses go something like this:
All this sounds great, until you do the math. Most photographers are paying $9.99 a month for Photoshop and Lightroom. Many are even content to stay on Photoshop CS6 while paying annually for the latest version of Lightroom. For those who are paying Adobe’s $9.99 subscription fee, however, the question is: does it make sense to up the payment to $49.99 per month just to create hyperlapses? In a word: no – especially for your typical hobbyist or semipro photographer. “There just has to be an alternative”, I thought – as I set about finding a cheaper way. And, in fact, there is – if you’re a Mac user (yes, I said cheaper and mac user.)
First: the editor. Adobe Premiere is great, but for $299, Apple’s Final Cut Pro X is an excellent non-linear editor you can install on multiple computers. It’s really a no-brainer – even if you hate the Magnetic Timeline.
Second: the stabilizer. Surprisingly, FCP X’s IntertiaCam stabilizer is pretty good at working its magic on hyperlapses. Unfortunately, however, fine grain control (like the ability to choose the stabilization area, or the ability to adjust stabilization in a specific axis) just isn’t there. For that you need a third-party plugin.
One stabilizer that came up often in my research is CoreMelt’s Lock&Load. Looking through blog entries, I saw a slew of folks talking about Lock&Load, but I couldn’t find examples of it being used with hyperlapses. So, I lined up the three stabilizers (InertiaCam, Lock&Load, and Warp Stabilizer) and created the video below comparing my raw sequence with the stabilizers’ output:
As you can see, the three stabilizers are pretty close in terms of the job they do. I was surprised by IntertiaCam – I just didn’t expect it to do that good of a job. It’s not perfect, but it far exceeded my expectations. I was also pretty surprised by Lock&Load; not only was it pretty fast at analyzing the motion in the clip, but it also comes with a slew of controls letting you fine tune the stabilization area and amount. Warp Stabilizer, ofcourse, did a great job as expected.
If you need to do the occasional hyperlapse just get yourself a copy of FCP X and use IntertiaCam. If you’re wiling to spend an extra $99, Lock&Load is a very capable stabilizer that will serve you well. It gives you a lot of control over stabilization and it’s FAST. It can also accommodate 4K footage if you’re shooting video. Yes, you’ll spend just under $400 for FCP X ($299) and Lock&Load ($99), but that’s still $200 less than what you’d pay for one year’s subscription to Adobe’s Creative Cloud. Finally, Creative Cloud (though expensive) comes with a ton of tools (Photoshop, Premiere, Illustrator – just to name a few) and many of you are already paying for the suite. If you’re already paying for the subscription then get out there, shoot, then fire up AE.
Note: CoreMelt provided a copy of Lock&Load for the purpose of this review.
You’re not a filmmaker; you’re a photographer. You deal in the moment; one image is all you need to tell a story. Filmmaking, you tell yourself, is another world – one that’s separate from yours.
Then, one day, you watch a timelapse and think: “I can do that – it’s just one exposure shot over and over again to convey the passage of time. How hard can it be?” So, you setup your tripod and camera, shoot a few hundred frames, and before long find yourself in a mystical world where reality is malleable and there you are: telling a story beyond one frame.
Now you’re hooked and it doesn’t take long for you to start wondering where to go next. A tripod and camera are nice, but motion is addictive. Sure, it maybe just the motion of a few clouds that gets you at first, but you want more. You want to create more interesting shots and take it to the next level.
Enter sliders, remotes, and motion control! Forget one shot to tell a story, you’ve gone over the edge now, and so has your budget! You thought lenses were expensive and heavy? Well, buckle up!!
Do a bit of digging and you’ll see motion control setups are all about modules. You have a slider, a motion control module, a timelapse module, and that’s just the beginning. Before long you’ll soon find yourself deciding what combination of gear you want: this slider, with that remote, with this motor, with this battery pack and at this or that length (this is not to mention accessories like ND filters and all the big bags you’ll need!). It’s not hard to spend $1500 – $3000 on a motion control setup.
I don’t want to say modularization is wrong. It’s not, in fact there’s flexibility in being able to assemble a rig to meet your needs. All I’m saying is it can get real expensive real quick.
Now, that’s probably the longest intro to a review there ever was, but context is important! Let’s talk about the Syrp Genie and the Magic Carpet Slider.
In looking over the state of timelapse, the question Syrp asked was this: what if you could have a programmable remote and motion control unit for under $900? The question wasn’t rhetorical – Syrp put together a kickstarter campaign and delivered just that with the Genie. I want to give the Genie a full-on review in the near future, so for now, trust me when I say it’s a pretty cool. HDR: it does it; Bulb ramping, yep it’s got that; the ability to create pre-programmed sequences: sure. It’s claim to fame though is its ability to pull itself along any cable. Checkout the video:
The Genie is a great, but what was missing though was the slider. Syrp initially left the slider to you, but recently came out with their vision of what one should be with the Magic Carpet.
Syrp’s vision is this: the Magic Carpet is designed for the Genie – to complete the product line, but it’s also open to allow you to use the slider with your existing gear.
The industrial design of the Magic Carpet is fantastic. Here’s just a few examples of nice touches:
Syrp’s video does a good job of breaking the features down. Check it out :
The above video is what Genie says it can do. But what can it really do? Here’s a short clip is shot with the Magic Caroet at blue hour.
The Magic Carpet comes as either a 2.6’ track or a 5.2’ track. You can just buy the track, but you’ll really want to spring for the kit with the carriage and the end caps. I’m not sure why you’d want the track itself, so let’s break down the kit options.
The 2.6’ track kit is about $300 on B&H
The 5.2’ track kit is just under $370 on B&H
The combo kit with both tracks, one carriage, and end caps set will set you back a little under $490 on B&H
Both tracks will support just over 15 lbs (15.4 to be exact)
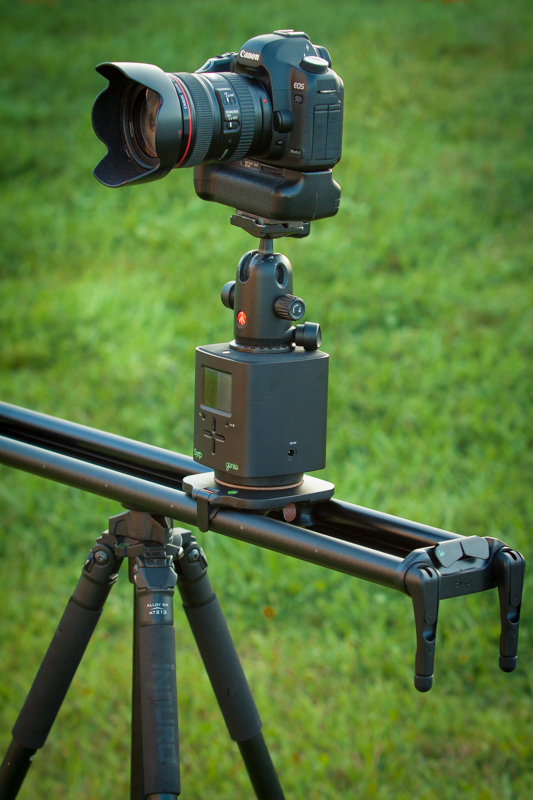
I didn’t have any issue with rigidity with my setup on flat ground using the legs for stability. My typical setup, by the way, is a 5DMKII mounted on top of the Genie usually with the Sigma 35 1.4 DG HSM A lens or the Canon 24-105 f/4L.
The carriage, by the way is fantastic. It’s buttery smooth and taut. It glides through easily.
I did see some flex on either end of t he short track when mounted on a tripod using only the center mounting hole. Fortunately, all the tracks have 1/4″ and 3/8″ mounting holes on both ends of the track.
While I prefer the shorter track for portability, I often go to the longer track as it allows me to get a good amount of stability while using only one tripod (you can angle the track by setting the tripod height and just letting the other end of the track sit on the ground.) It’s all a tradeoff: carry around a long track and a big tripod or a short track and two smaller tripods (if you want to work on the extreme edges of the track). There’s no ‘right answer’. It just depends on your shoot.
I’m a sucker for elegant design and the Magic Carpet is beautifully designed. Syrp puts a lot of thought and effort into industrial design and it shows. Yes, you will have some flex on the shorter track, but it is quite portable and a offers a good mid-point between rigidity and weight. Combined with the Genie, it’s a great slider to own. If you spring for the combo kit, you’re looking at under $500 that, in return, will give you a good range of timelapse options.

I’m not a hardcore storm chaser, but one of my close friends is, and he invited me out one night to chase this lightning display. Now I don’t know about you, but I reckon me that’s a lightning strike!
Now, this was a fun night. Here’s a storm chasing tip for you: if you’re chasing a lightning storm and driving out in the middle of nowhere in the dark, you may not want to be doing so with a sports car.
I showed up at the spot where we were supposed to setup, and promptly got stuck in mud (I could not see well in the dark). My buddy got a good laugh at me (as I was blaming it all on him), tried digging me out, then we just said “forget it” and called the fine folks at Geico to get the car pulled. Being photographers, we just decided to leave the car and go get setup to shoot.
The tow truck arrived an our or so later. The driver took a look at the car and gave me this look that said: 1. Are you aware, sir, this car is not a Hummer? 2. What are you doing out here at the edge of a lightning storm with a large metal pole? (aka tripod). I quickly informed him how this was all my friend’s fault (my “friend” who was heartily enjoying taking photos of the whole incident for Facebook) and just took the abuse :).
It’s all good; in the end, it’s a good shot and it was a night to remember.
I call this shot ‘Lightning Man’, by the way, as it looks like a figure of a man in the sky. This is a 30sec exposure shot at f/10 ISO 400.

I headed off to the Magic Kingdom and Fort Wilderness lodge with the usual suspects of central florida photographers (you know who you are!) last week and captured this image in the Lodge’s lobby.
Disney always does a great job with the decorations in the resort lobbies. The Grand Floridian, for example, has an amazing tree as well. We had planned on heading there, but as with most photowalks, we spent most of our time photo-stopped and didn’t get very far!

This is the Disney Fantasy (Disney Cruise Line’s newest ship) docked in Cozumel, Mexico in late September. I took this shot after a long day at port immediately before boarding to depart for Grand Cayman.
Cozumel was a fun port of call – complete with Mayan Ruins at San Gervasio; now they’re not what one would imagine Mayan ruins to be (tall pyramids nestled in a valley, etc). They’re about 35 minutes out from the port and they’re easy to get to and walk around. Everyone will tell you the mosquitos are really bad, but they really aren’t – though this could have been a function of being out there in late September.
As for the Fantasy, the ship is, in a word, amazing. It’s beautiful, clean, and very well maintained. It’s not hard to see why it’s the jewel in the Disney Cruise Line fleet. I won’t do a full review here but I will recommend mousesavers for a good discussion on DCL and the Fantasy.
What is it?
You have phone; you have a camera. Wouldn’t it be nice to be able to trigger your camera from your phone? And, since your phone is, in essence a miniaturized computer, wouldn’t it be great if you had an app enabling you to use your phone as a programmable intervalometer and shutter release? Also, if you could use your phone as a trigger, wouldn’t it be interesting if you could use your phone’s sensors to trigger your camera based on sound, vibration, and so on?
That, in a nutshell, is TriggerTrap: a mobile dongle you can use to connect your camera to your iOS or Android devices for about $35. It’s compatible with a wide range of cameras from Canon, Nikon, and Sony to Fuji, Panasonic, and a slew of others.
Using it
TriggerTrap is straightforward to use: connect it up to your camera, choose your mode in the app and fire. You’ll have to think about how to mount your phone to your camera or tripod, but that’s a pretty easy hurdle to get over. I ended up with the ChargerCity hotshoe mount for $15. There are more expensive options out there (especially if you want to mount your phone to your tripod; something you’ll want to do if you’re working in windy conditions), but for $15 you can’t go wrong.
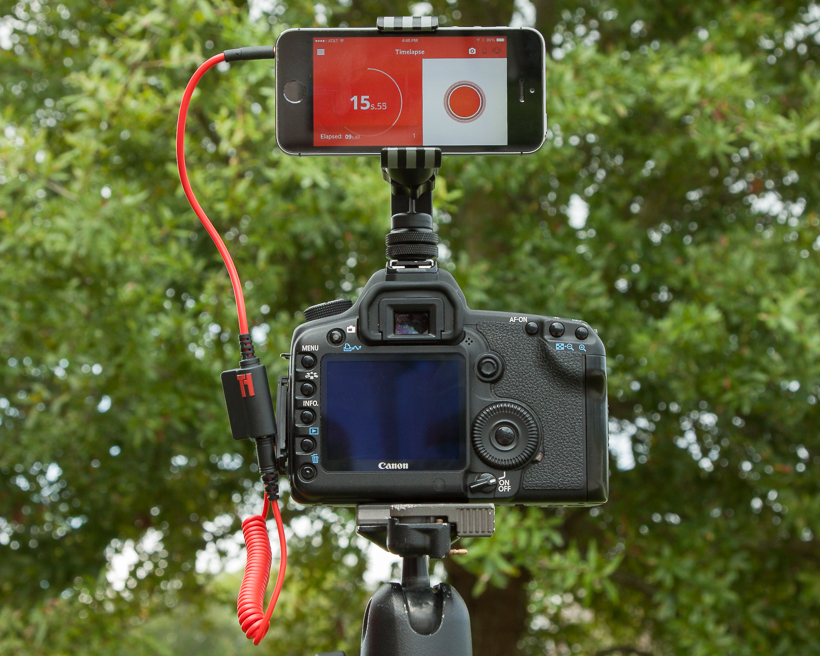
TriggerTrap mounted using a flash hotshoe bracket
Camera Control Functionality
TriggerTrap is not a full camera controller (it doesn’t control ISO, aperture, and so-on). Nonetheless, it does offer a wide range of functionality. Just take a look below at all the modes available in the app: you won’t be short on things to do! (the app is free, by the way, so you can download it and experiment to get a sense of the user interface):
Cable Release Modes
Timelapse Modes
Sensor Modes
HDR Modes
*can be used to take images with your phone’s camera.
Some other cool stuff:
Many of TriggerTrap’s modes allow you to use one phone/tablet/etc as a master and others as a slave. For example: you can use your iPhone to trigger your camera while also triggering several speedlites.
TriggerTrap also has a handy neutral density filter calculator and simple solar calculator showing you Sunrise and Sunset times.
As an HDR trigger
TriggerTrap will work great to trigger an autobracket sequence you have programmed into your camera. It’s also a great device to allow you to take those 5,7,9+ HDR exposures. However, there’s one thing you need to keep in mind if you’re going to put your camera into Bulb mode and use TriggerTrap to set the exposure times. That thing is: every camera has a minimum bulb exposure time. A good limit is somewhere around 1/20th of a second. What this means is you won’t be able to shoot that 1/100 exposure during the day. This won’t be an issue if you’re shooting before sunrise/after sunset, but it will be an issue for you if you’re shooting during the day without a neutral density filter. While this is more of a camera limitation than a TriggerTrap limitation, it’s still something to keep in mind.
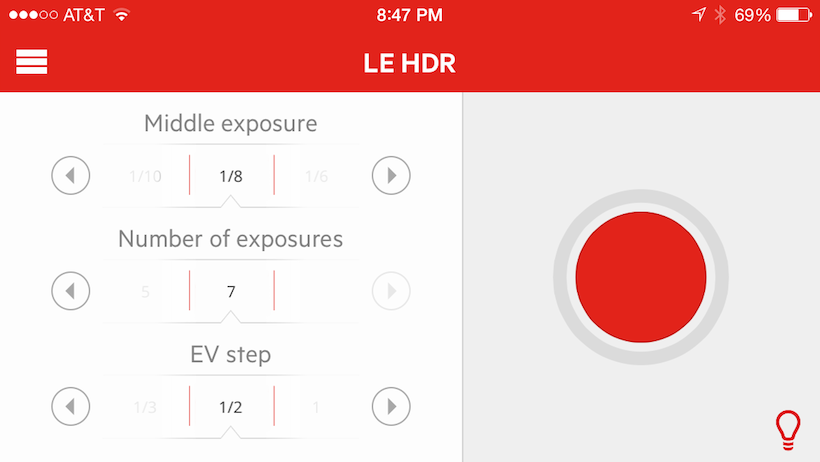
TriggerTrap used to take 7 exposure HDR
As an intervalometer
As a simple intervalometer TriggerTrap is great. It’s very intuitive to use and I like how the app uses a graphical indicator to tell you when the next exposure will be fired. For more complex intervals, you can use the Star Trail mode to dial-in the exposure time and the interval between exposures. I’d name the Star Trail mode something else as it does more than just Star Trails, but that’s not a big deal.
I like the Time Warp and Distance Lapse modes, especially the simulation in the TimeWarp mode to give you an idea of what the acceleration and deceleration of the interval will look like. Distance Lapse is very handy for shooting sequences in a car. The one thing I didn’t like is bulb ramping.
Bulb Ramping
As it stands, TriggerTrap’s bulb ramping exposure controls modifies exposures from the beginning of the ramp to the end of it. It would be nice if you could start a specific exposure then wait a predetermined time before ramping. From there, it would be ideal to set how long to ramp for before reaching the end ramp exposure and then continuing on at a final exposure time. It would also be nice to speed up/slow down the ramping rate if need be.
You won’t care if you won’t be using TriggerTrap to shoot Holy Grail timelapses, but this is something I would very much like to see improved in future releases.
Other Tidbits:
Get an iPod Touch: But everyone uses phones now! I know, but you’re going to miss your phone when you’re shooting an three-hour-long timelapse and have nothing to do but sit around and wait. Especially if you want to use your phone to, you know, make phone calls.
Connect everything then turn on the app: I had some trouble initially getting the camera to trigger. To get it to work, I needed to first connect the camera and phone, turn up the phone volume to max then start the app.
External Battery Source: you’re going to want a battery pack for your phone if you’re planning on doing long duration timelapses. (Anker’s 3200mah battery is a good choice). Battery packs aren’t too expensive these days, you’ll want to keep one on hand.
Should you buy it
I suspect Canon users (like me) will find TriggerTrap more compelling than Nikon users. Nikoners (Nikonites?) with their built-in intervalometers may not find TriggerTrap a need, unless features like TimeWarp, Distance Lapse, and the Sensor modes are desired creative options.
Overall, it really depends on what your expectations are. TriggerTrap is a good device at a reasonable price point. If you’re looking for a hardcore intervalometer, however, TriggerTrap may not be for you – especially with the limited bulb ramping functionality.
That said, TriggerTrap has historically been good at updating their app and adding features; it’s not inconceivable for the bulb ramping to be improved in the future. Also, in terms of user interface, TriggerTrap is easy to use and program.
Where to buy
Amazon: Dongle only (you will need a cable compatible with your camera)
Amazon: Nikon (Dongle + Cable)
TriggerTrap: Canon (Dongle+Cable)
Amazon: Charger City Phone hotshoe Mount
Amazon: Anker 3200mah external battery

An early morning shot of San Diego’s Coronado Island Pier. I got to the Island just before sunrise to shoot the skyline. Once I got the blue hour shot I wanted, I did what photographers usually do: ask myself “well, what else can I shoot?”
The pier was perfect. It’s a pretty small pier, and significantly smaller than the Lajolla’s. It was a bit of a squeeze to get under it, but still easy enough to work with (that’s my way of saying I didn’t bump my head). I took off my shoes, got setup, waited for a few boats to clear on out of the frame, and shot 3 images.
Syrp is one of those companies you’re happy to see succeed. Just take a look a Syrp’s team and how they describe themselves in their contact page to get a sense of the Syrp mindset: just plain cool. The company started with a successful kickstarter campaign to launch the ambitious, yet well-implemented, Genie Motion Control Time Lapse head. Not being content to just stay still, though, Syrp recently introduced two new products: the Magic Carpet Slider and the Variable Neutral Density (ND) filter.
I’ll get to the Genie and Magic Carpet Slider in upcoming posts. Today, we’ll be looking at Syrp’s ND filter.
What is it & A little bit of background
Constant and variable ND filters have been used in astronomy, cinematography, and photography for some time. Ask any amateur astronomer how they attenuate (i.e. reduce) the full moon’s light, and they will reach into their bag and show you a small variable neutral density filter. Cinematographers use ND filters to allow for shallow depth of field shots during the day, and photographers use them to create a sense of motion in brightly lit scenes. Ever lamented your inability to use a slow shutter speed to photograph a waterfall at mid-day? You would have been able to if you had a neutral density filter.
How Neutral Density filters work
Variable NDs are comprised of two polarizing filters stacked on top of one another. A polarizing filter, as you may know, works by blocking incoming light at 90 degrees to the filter. Stack two filters on top of one another at 90 degrees, and they can block out a significant amount of light. In the case of the Syrp variable ND filter, that amount of light varies from 1 stop (i.e. ½ the light) to 8.5 stops (i.e. 17 times less light) depending on the relative angle of the two polarizers to one another.
Think of it this way: if the relative angle of the two filters is zero, you get the minimum attenuation. Conversely, at 90 degrees, you get the maximum attenuation. Stated simply, you turn the variable ND filter one way you get less light; turn it another, you get more light.
Variable vs Constant Neutral Density Filters
Sounds great, so why aren’t all ND filters variable? Why do manufactures even sell constant filters? The reason for this is making a good variable neutral density filter isn’t easy. Variable ND’s are susceptible to color shifts. If not done right, a variable ND’s color shift can vary widely across the rotation range. On one end of the rotation you might get a blue-red shift, while on the other, you get a green shift. That said, even constant (i.e. non-variable) neutral density filters, have color shifts. But, those color shifts are, as might be expected, constant (for obvious reasons.)
Additionally, keep in mind a variable ND stacks two pieces of glass on top of one another in front of your lens. If the materials and craftsmanship aren’t top-notch, a discernable loss of sharpness can occur- often in the corners, but also in the center of the frame.
Large Vs. Small
Syrp created two versions of the ND filter: large and small. The small filter is 67mm and comes with step-up rings for 52mm and 58mm lenses. The large filter is 82mm and comes with step-up rings for 72mm and 77mm lenses. Both filters come with a sweet leather case (seriously, it’s a thing of beauty) and a cleaning cloth. Pricing is $139 for the small filter and $189 for the large filter.
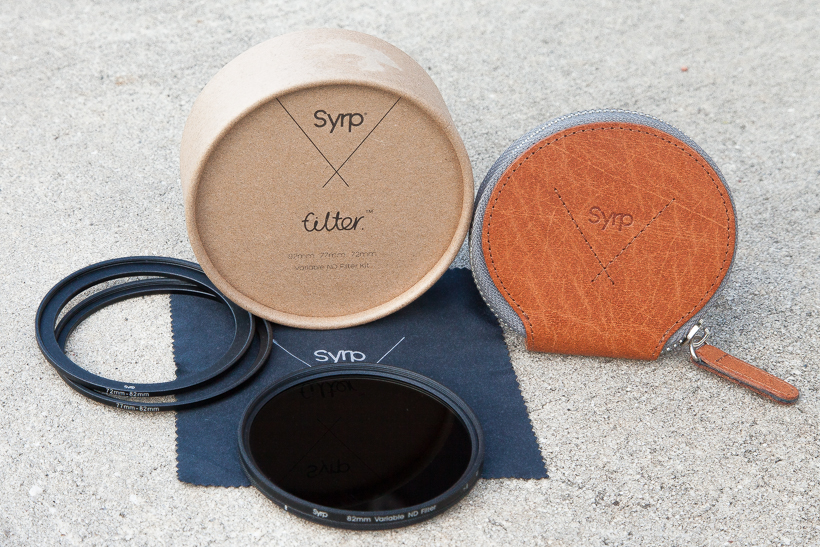
The Syrp Variable ND Filter: everything in the box
Color & Sharpness
I was impressed with the filter’s optical performance. The Syrp Variable ND shows a consistent, and well-controlled, green color shift. I was expecting a lot more variance out of a filter at this price range, but it wasn’t there. Also, the shift is consistent across the rotation range and is easily correctable in Camera Raw or Lightrooom (i.e. you don’t get a blue shift on one end, and a green shift on the other). This is a big deal, because the last thing you want to do is color-correct for every little turn of the filter you might have made during your photo session. I also didn’t see much vingetting; that was a real surprise.
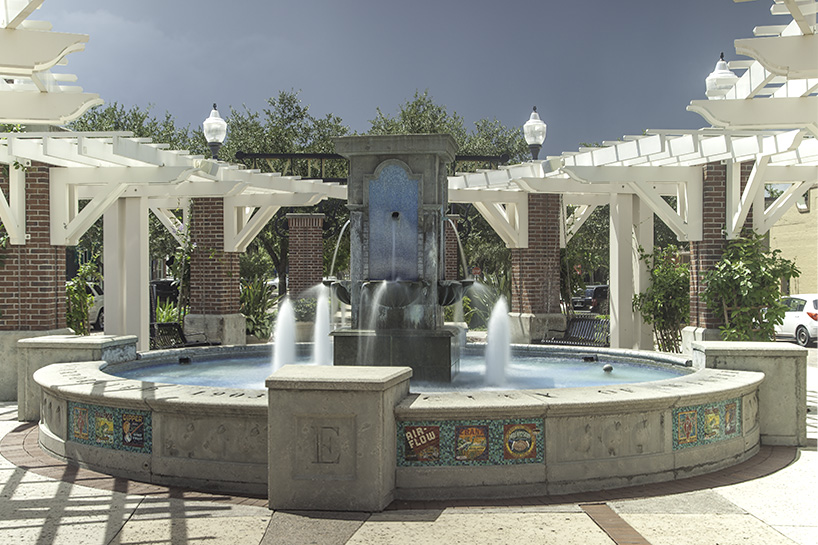
The image does get a bit softer at 8.5 stops than without the filter, but it is usable.
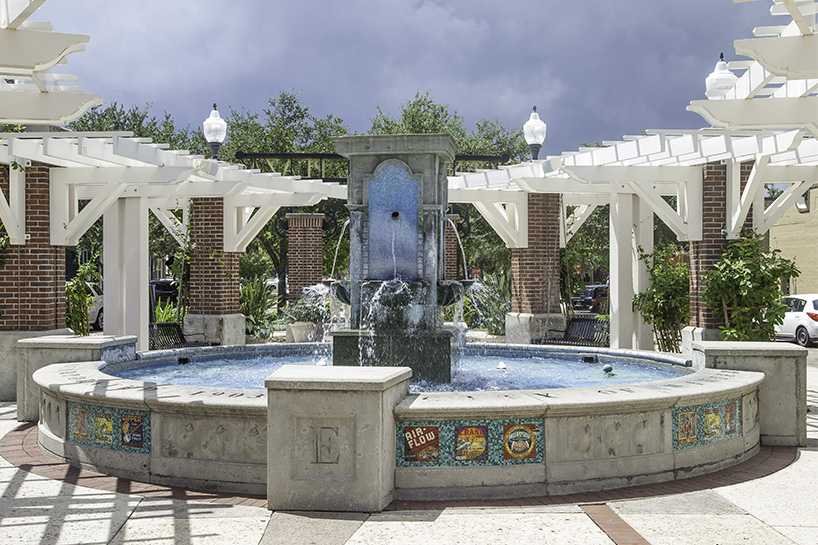
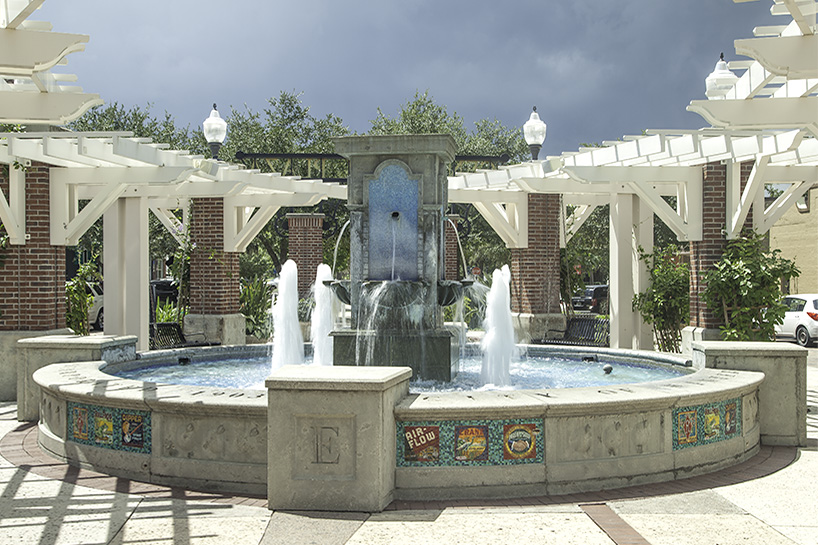
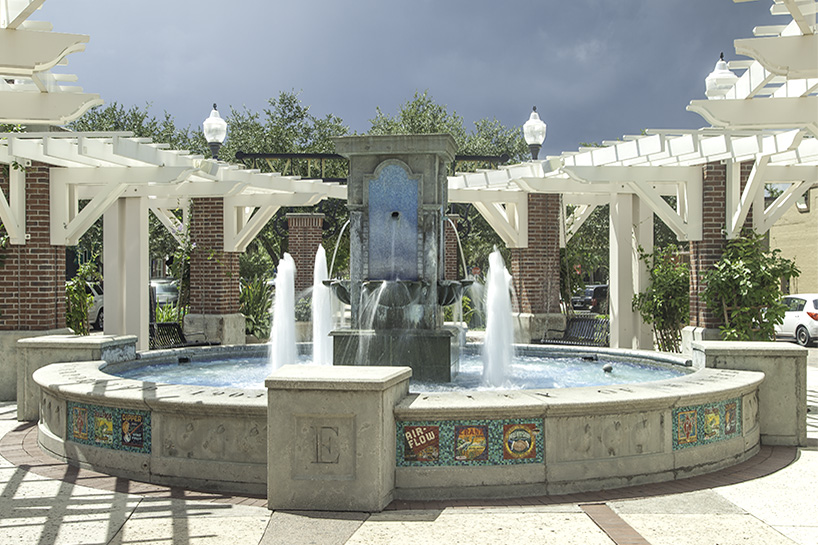
Take a look a the series of images below comparing an image taken with no filter vs images taken with the Syrp variable ND filter at various stops. Drag the slider to see more of either image. The last image you see in the series is a color-corrected image taken with the Syrp filter at 8.5 stops. Note: all the images were taken on a tripod within a few seconds of one another.
No Filter vs Syrp Variable ND at 1 stop
[twentytwenty]
No Filter vs Syrp Variable ND at 3 stops
[twentytwenty]
[/twentytwenty]
No Filter vs Syrp Variable ND at 5 stops
[twentytwenty]

[/twentytwenty]
No Filter vs Syrp Variable ND at 8.5 stops
[twentytwenty]

 [/twentytwenty]
Image taken with the Syrp Variable ND at 8.5 stops – quick and dirty color correction in Lightroom.

Using It
The stops are clearly defined on the filter as I, II, III, IIII, IIIII, IIIIII, IIIIIII, IIIIIIII, IIIIIIII+ (the last being 8.5 stops). I like that the stops are demarcated, but I think the single notches can be hard to read after about 5 stops. It’s not a big deal, as I was able to tell what stop I was at. But, part of me wonders if it wouldn’t have been easier to just use digits.
Also, while there’s a small indicator dot to line up the stop to, it’s not clear whether I should be aligning the first “I” or middle “I” to the indicator. It would have been great to have a dot to show me where to align for a particular stop.
The stop marks and the indicator are minor quibbles. It’s really not hard to sort out what stop you’re at. Besides, what you’re really looking for when using an ND filter is a target shutter speed. You’re just spinning the filter until you get to your desired shutter speed. Do you really need to line up an indicator to a dot? No, you don’t.
I did have a bit of stickiness with the step-up ring to my Canon 77mm lenses. However, I never had to use a filter wrench to remove the filter. The filter motion is smooth.
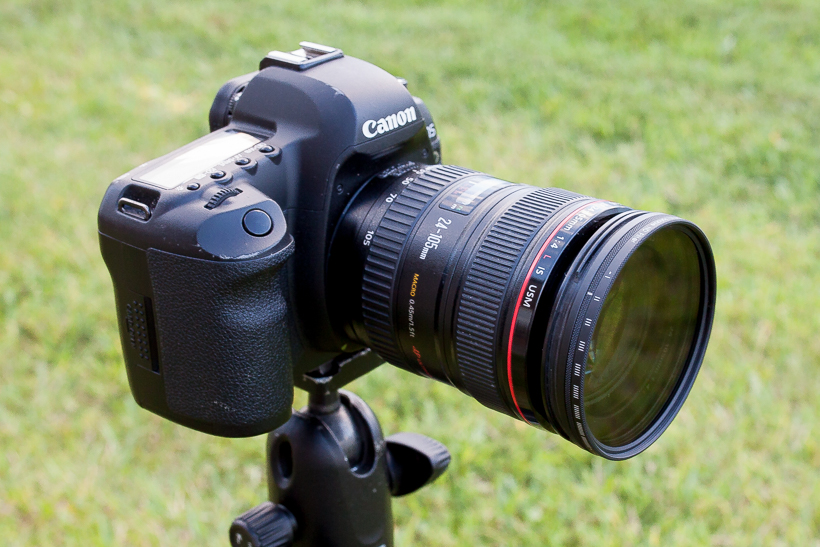
The filter mounted on my battle-scarred 24-105f/4L
Should you buy it
Some minor notes on numerals and stop indicators aside, the Syrp Variable ND filter is a strong performer. It shows a consistent, well-controlled, and manageable color shift across the rotation range while still yielding a sharp image. That’s a lot to pack into a sub- $200 variable ND.
At $139 for the small and $189 for the large filter, the price is well below comparable filters from B+W and Singh Ray (where you’ll be spending $300 and up). All-in-all, you get good optical performance at a decent price. Besides, you’ll really want that filter case!
Where to buy
B&H: Syrp ND Filter – Small
B&H: Syrp ND Filter – Large