Small hard drives like the Seagate’s 2TB backup Slim or Western Digital’s 2TB Elements are useful quality devices, but they suffer from one fatal flaw: they are hard drives, and all hard drives fail over time without exception. It’s not a matter of if but when. Tragically, when it happens, you may not even know it.
It didn’t quite register for me when my 2TB Seagate started to fail. The drive seemed fine; it was useable and my images on it were, in fact, accessible. While the drive disconnected more than it should, the frequency of disconnects did not seem concerning. “Perhaps it was due to a bad cable?” I thought. Maybe I was just jostling the cable more than I should; or maybe the cable just wasn’t seating well after many uses.
The problem was infrequent and intermittent. Replacing the cable seemed to address most, but not all, of the disconnects. Now while traveling, I sometimes moved or bumped the laptop and/or drive, so perhaps this was to be expected. Experientially, disconnects seemed to be happening less. I thought I was ok, but then, as in bad horror movie, the zombie struck. I did not know it was there, but it was lurking, transforming into more of a monster every time I used the drive.
Though the drive had more than 50% of storage space available, I decided to move my data to a larger, faster model. I needed to edit 4K video and my little 2TB Seagate just wasn’t going to be fast enough or have enough space. I settled on a fast and reliable G-Technology 6-TB drive capable of read/write speeds of over 220mb/s (easily twice as fast as my small Seagate). The G-Technology was going to be my new “main” drive.
I was in the process of moving images I captured at Yosemite when some of the photos did not copy. No worries… just a few images in the grand scheme of things. Maybe something got corrupted during the copy? Maybe try again?
I did so without success. I then tried moving images from a sunset at Oregon’s Cannon Beach. No, those failed too. Several other directories, all at once, became problematic. I was a zombie’s dinner…The drive was dead…or rather, undead; it was there, but it was gone.
Now you’re probably thinking, “I sure hope you had a backup.” I had two, actually, or so I thought. First, I had a 4TB drive I would regularly move images to. It was a drive on another computer on the network and getting images to it was manual, slow, and cumbersome, as transport happened over wifi (this was part of the reason I wanted a directly attached, large capacity drive like the G-Technology).
My other line of defense was Backblaze, an inexpensive way to continually (and automatically) upload images to the cloud. The only downside is you have to connect external drives once a month, or they will be removed from your Backblaze backup. I have a pile of drives, and unfortunately, as I was coming off the road and moving back into our home, I neglected to plug this particular drive into the computer. BackBlaze no longer had a copy. The 4 TB drive had some of the images from manual copies I was performing but not all of them.
You have options when hard drives fail. The first thing that comes to mind is data recovery services. The way these work is to package your drive up, send it out to a reputable, experienced facility with a clean room, and wait to find out how much you will pay. You can expect to spend somewhere between $400-$2000, depending on the amount of effort necessary to recover your data. $400-$600 is typical.
The other option you have is to utilize an application to recover the data. This is an attractive option, as you can try it at home, and it is relatively inexpensive. It will only work, however, if your drive still mounts. You’re dead if your drive is unusable. But in my case, my drive was undead; it was readable, and it did show up on my desktop. I could even see its directories, just not load anything from them! Zombie, thank goodness!
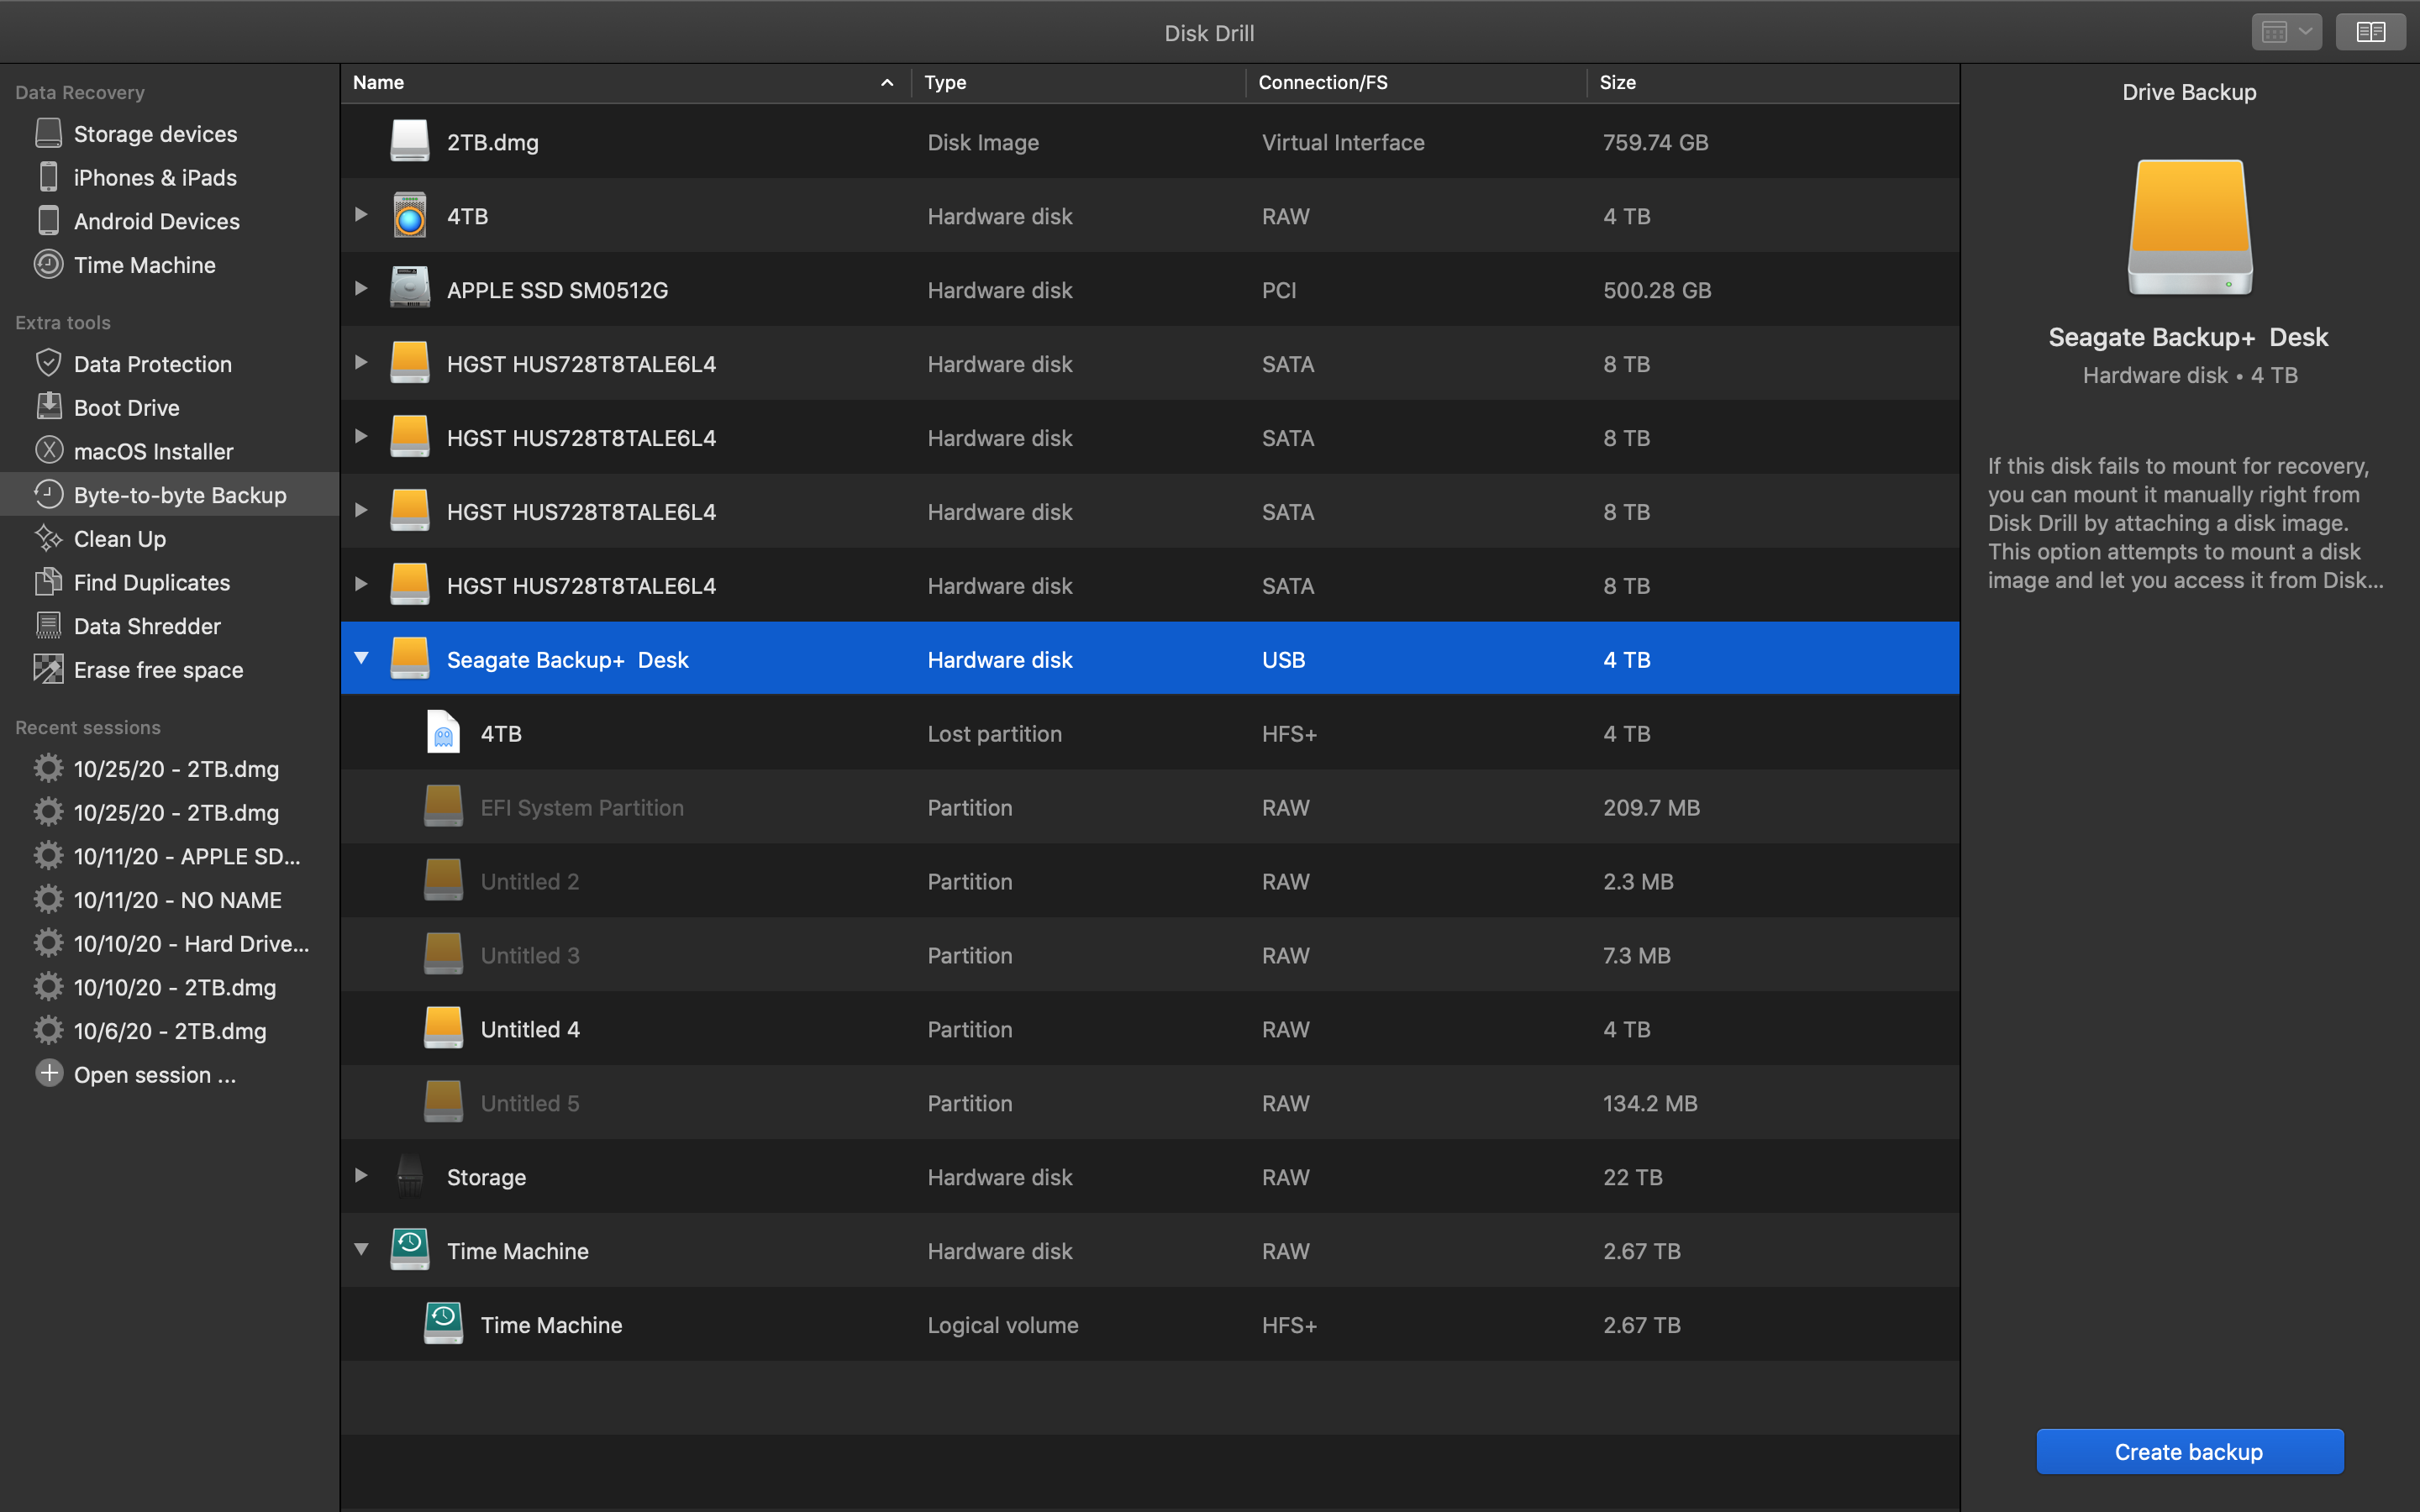
After some research, I settled on Disk Drill, as it had one very attractive feature: the ability to create a byte-level drive image that you then perform a backup on. Most other applications out there will attempt to perform a low-level read on the drive, which is great… unless your drive is susceptible to disconnecting randomly. If this happens, you basically have to start all over again from zero anytime the drive goes offline.
Disk Drill, on the other hand, can create an appendable drive image. If image creation fails (let’s say your drive connection drops), you can just start where you left off and append to the drive image you were working on. Another very attractive thing about Disk Drill is that it is free to try and is available for both Mac and Windows. To perform data recovery, you’ll want to upgrade to the pro version at $89, but at least you don’t have to spend the money unless you know there is data to recover. Quick note here for full disclosure: I was so impressed with Disk Drill, I reached out to the company, who agreed to provide a pro license for this review.

Disk Drill 4 can create byte-level backups for data recovery
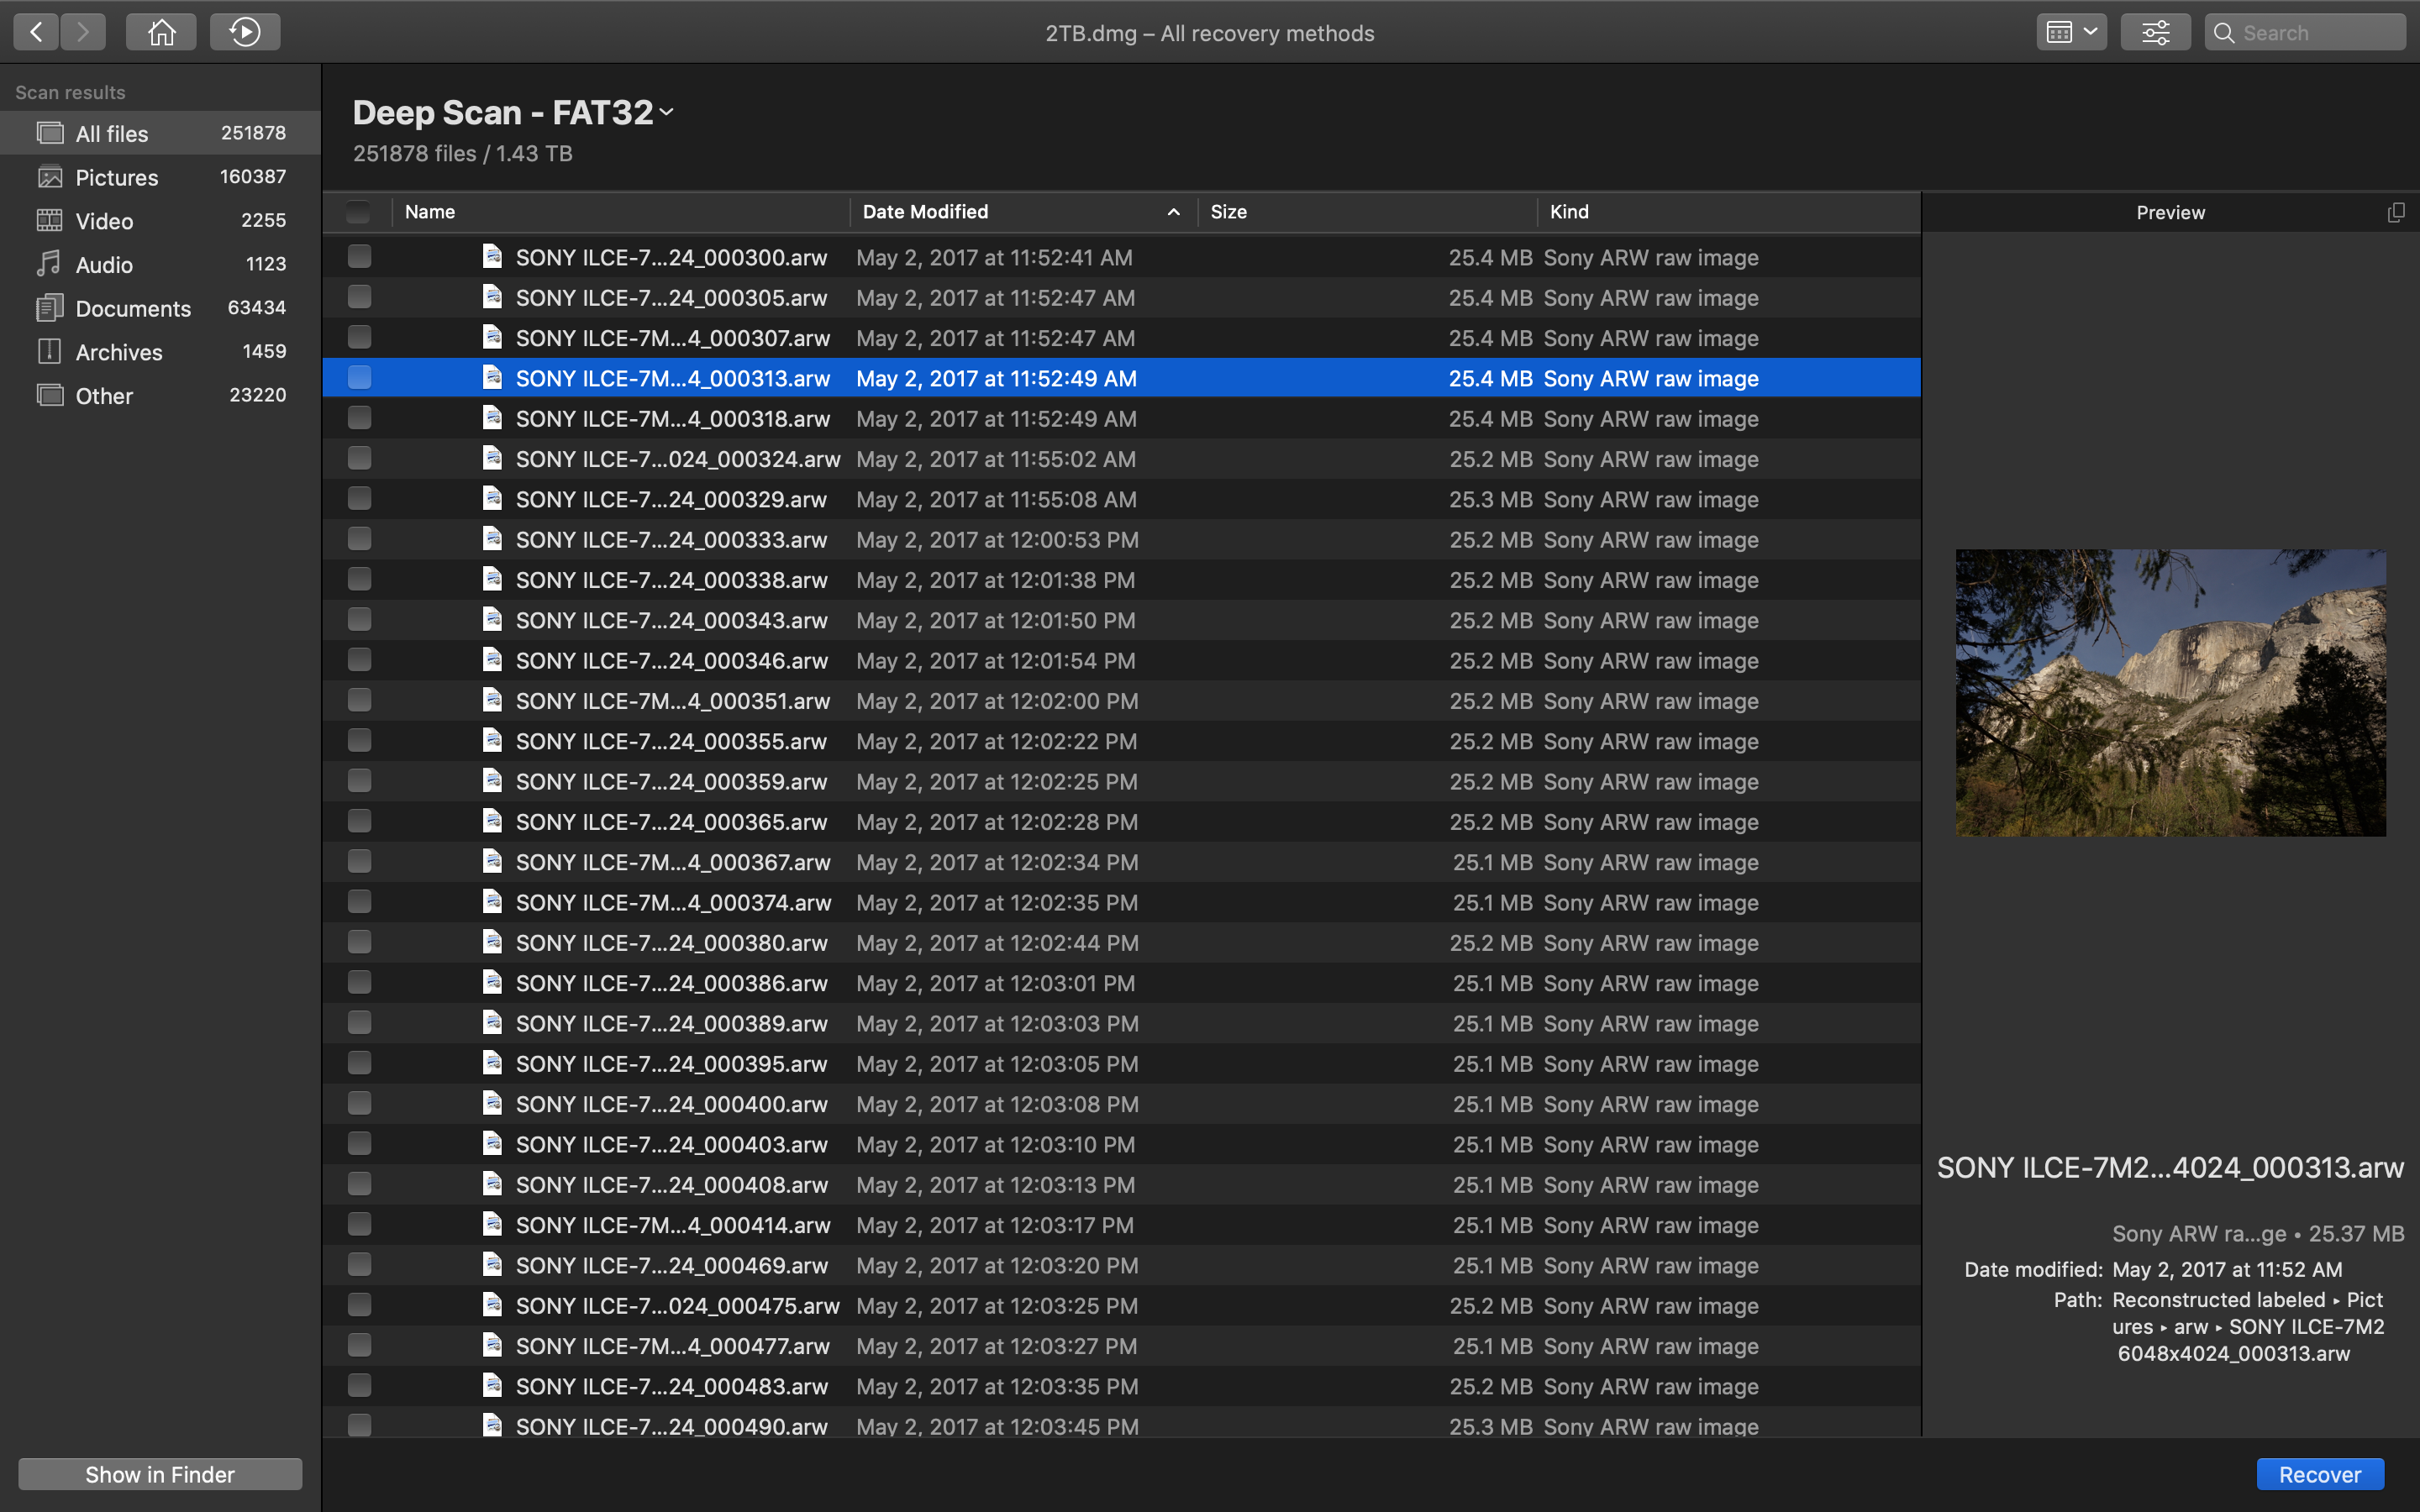
What’s really great is you don’t have to wait until the full drive image is created before recovering data. I’ve been using Disk Drill and am about 37% through the data backup. I wanted to see what, if anything, it was able to recover. So I paused the recovery, loaded up the created drive image, and ran Disk Drill’s recovery processes. I was beyond pleased when I saw what I could recover. Take a look below at the long list of images it found:

Disk Drill is able to successfully recover images from a bad drive
Note the preview pane on the right showing the recoverable image. I retrieved several images and was able to copy them to the folder used by my Lightroom catalog. I was even able edit the images and export tiff files. One thing to note here: not all these images were images I needed. Disk Drill even found images I had already copied off in the past and that had been intentionally deleted on the drive. While I already had those images, it’s good to know Disk Drill could recover deleted data if needed.
Recovery can take some time depending on how functional your drive is. It’s also completely possible you won’t be able to recover anything. On the plus side, as I mentioned, you can see what is recoverable using the free version. If you’re happy, pick up the Pro version for $89, and call yourself lucky. If not, you’ll be sending your drive off to data recovery and hoping you don’t have to send every dollar in your bank account along with it.
Another thing to keep in mind: DiskDrill isn’t limited to working with failing drives; it can also recover data from SD cards (ever format a card by accident?) or deleted files on your computer (after a format or after you’ve cleared your Trash Bin, for example).
It’s great to have been able to recover data, but it’s much, much, better to have a reliable storage solution and backup plan. Depending on manually copying data over to a large drive is just a bad plan. We all get busy and make excuses; manual backups are a no-go. Don’t do it, unless you are doing so to create a full copy of a drive to send to another location (it’s good to have a copy at a relative’s house just in case you have a theft or fire at your home).
BackBlaze is a fantastic service I highly recommend… but only if you have sufficient bandwidth and remember to connect your external drives. I had limited cellular bandwidth in many of the places I traveled in the last few years. Also, the limited physical space of living in an RV on the road did not allow me to keep a laptop open and running day after day. It was just impossible to continually upload data. I had about 85% of my images backed up at any one time, but I was constantly behind, as I was shooting faster than my connection allowed me to upload data. Also, as I mentioned, I did not plug in my failing drive. Again, I do believe cloud storage is essential. But relying on uploads alone is not advisable.
The plan moving forward is multiple redundancies. I currently have under 6TB of images. I’m going to keep my G-Technology Drive as a local backup until I exceed its capacity, at which point I will move to a larger drive. In addition, I’m going to utilize an OWC ThunderBay 4 Raid 5 Array (review coming soon) to store my images. A Raid array offers both speed and redundancy; using four Raided 8TB drives working in concert, I’m able to achieve SSD speeds while having 24TB of storage with the ability to keep working if one drive fails.
Right now, my Thunderbay 4 is up and running. I have full local copies as well as data up in the cloud. I’m optimistic about being able retrieve most, if not all, of my data using Disk Drill (so long as my zombie drive remains undead and not fully dead). I’ll report back once recovery is complete, but I do expect it to take some time.
In the meantime, is your backup solution adequate? Have you lost a drive? If so, what did you do? Drop me a line in the comments. One last thing… backup your data; don’t get bit!
Leave a Reply
You must be logged in to post a comment.